项目已托管于 GitHub:y0ngb1n/spring-boot-samples,欢迎 Star, Fork 😘
Swagger 又称丝袜哥,号称可以让程序员边写代码边生产接口文档。
添加 Swagger 2 依赖
在 pom.xml 中添加 Swagger 2 所需依赖:
<dependency>
  <groupId>io.springfox</groupId>
  <artifactId>springfox-swagger2</artifactId>
  <version>2.9.2</version>
</dependency>
|
添加 Swagger 的 Java 配置
@Configuration
@EnableSwagger2
public class SwaggerConfig {

  @Bean
  public Docket api() {
    return new Docket(DocumentationType.SWAGGER_2)
      .apiInfo(apiInfo())
      .select()
      .apis(RequestHandlerSelectors.any())
      .paths(PathSelectors.any())
      .build();
  }
}
|
Swagger 注解说明
Swagger 通过注解表明该接口会生成文档,包括接口名、请求方法、参数、返回信息的等等。
@Api:修饰整个类,描述 Controller 的作用@ApiOperation:描述一个类的一个方法,或者说一个接口@ApiParam:单个参数描述@ApiModel:用对象来接收参数@ApiProperty:用对象接收参数时,描述对象的一个字段@ApiResponse:HTTP 响应其中 1 个描述@ApiResponses:HTTP 响应整体描述@ApiIgnore:使用该注解忽略这个API@ApiImplicitParam:一个请求参数@ApiImplicitParams:多个请求参数
以上这些就是最常用的几个注解了。
具体其他的注解,查看:https://github.com/swagger-api/swagger-core/wiki/Annotations
更多请参考 Swagger 注解文档
添加 Controller、Model 来测试效果
@Api(value = "用户管理", description = "用户信息的「增、删、查、改」操作")
@RestController
@RequestMapping(path = "/sample/users")
public class UserController {

  private static Map<Long, UserModel> users = Collections.synchronizedMap(new HashMap<>());

  @ApiOperation(value = "用户列表")
  @GetMapping(path = "/")
  public List<UserModel> getUserList() {
    return new ArrayList<>(users.values());
  }

  @ApiOperation(value = "创建用户", notes = "根据 User 对象创建用户")
  @ApiImplicitParam(name = "user", value = "用户详细实体", required = true, dataTypeClass = UserModel.class)
  @PostMapping(path = "/")
  public UserModel createUser(@RequestBody UserModel user) {
    users.put(user.getId(), user);
    return user;
  }

  @ApiOperation(value = "用户详细信息", notes = "根据 ID 获取用户详细信息")
  @ApiImplicitParam(name = "id", value = "用户 ID", required = true, dataType = "Long")
  @GetMapping(path = "/{id}")
  public UserModel getUser(@PathVariable Long id) {
    return users.get(id);
  }

  @ApiOperation(value = "更新用户详细信息", notes = "根据 ID 指定更新对象, 并根据 User 信息来更新用户详细信息")
  @ApiImplicitParams({
      @ApiImplicitParam(name = "id", value = "用户 ID", required = true, dataTypeClass = Long.class),
      @ApiImplicitParam(name = "user", value = "用户详细实体", required = true, dataTypeClass = UserModel.class)
  })
  @PutMapping(path = "/{id}")
  public UserModel updateUser(@PathVariable Long id, @RequestBody UserModel user) {
    UserModel updateUser = users.get(id);
    updateUser.setName(user.getName());
    updateUser.setAge(user.getAge());
    updateUser.setEmail(user.getEmail());
    users.put(id, updateUser);
    return updateUser;
  }

  @ApiOperation(value = "删除用户", notes = "根据 ID 指定删除对象")
  @ApiImplicitParam(name = "id", value = "用户 ID", required = true, dataType = "Long")
  @DeleteMapping(path = "/{id}")
  public String deleteUser(@PathVariable Long id) {
    users.remove(id);
    return "success";
  }
}
|
@Data
@ApiModel(value = "用户模型", description = "用户详细信息实体类")
public class UserModel {

  @ApiModelProperty(value = "用户 ID")
  private Long id;

  @ApiModelProperty(value = "名字", allowableValues = "y0ngb1n, tony")
  private String name;

  @ApiModelProperty(value = "年龄", allowableValues = "range[1, 120]")
  private Integer age;

  @ApiModelProperty(value = "邮箱")
  private String email;
}
|
此时可以启动项目进行验证是否成功集成 Swagger 2 了,启动项目后,在日志中可以看到 Swagger 为我们添加了访问端点 /v2/api-docs:
...
2019-12-28 22:19:53.880  INFO 11935 --- [main] pertySourcedRequestMappingHandlerMapping : Mapped URL path [/v2/api-docs] onto method [public org.springframework.http.ResponseEntity<springfox.documentation.spring.web.json.Json> springfox.documentation.swagger2.web.Swagger2Controller.getDocumentation(java.lang.String,javax.servlet.http.HttpServletRequest)]
...
|
通过浏览器访问 http://localhost:8080/v2/api-docs,可以发现返回的结果是一段 JSON 串,可读性非常差。幸运的是 Swagger 2 为我们提供了可视化的交互界面 SwaggerUI,下面我们就一起来试试吧。
添加 Swagger UI 依赖
同上面一样,在 pom.xml 中添加 Swagger UI 所需依赖:
<dependency>
  <groupId>io.springfox</groupId>
  <artifactId>springfox-swagger-ui</artifactId>
  <version>2.9.2</version>
</dependency>
|
添加完成后,重新启动项目,然后通过浏览器访问 http://localhost:8080/swagger-ui.html,便以看到下面就效果:
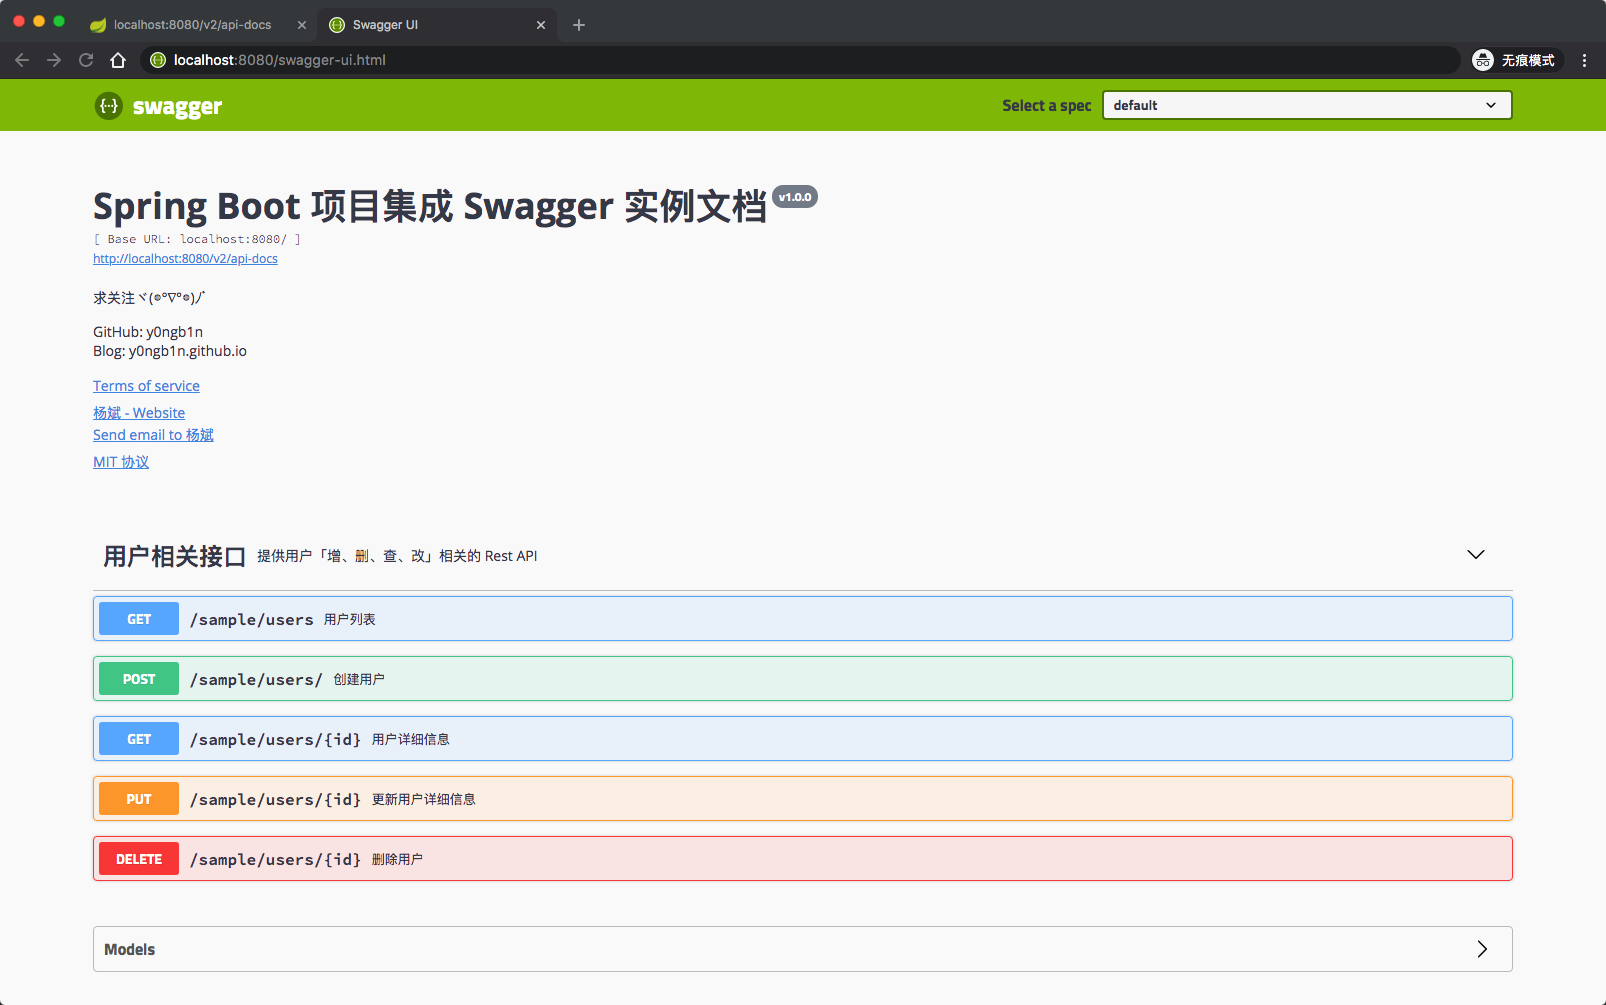
到这里就集成 Swagger 成功了,更多高阶的操作就等继续看文档或下面的参考链接进一步摸索了,祝学习愉快!
🔗️ 参考链接